My X-E1 Film Simulation Recipe C1: Classic Chrome
Since getting my Fujifilm X-E1 recently, I've spent a bit of time exploring and setting up my own film simulation recipes.
As an old film shooter, who enjoys using film from time to time, the lure of using a digital camera that you can set to 'Velvia' is very enticing. Even though we all know that it's still only a digital file - right?! And what's even more enticing - to me at least - is having the ability to create your own film 'looks' (up to seven in the X-E1) and access them very quickly.
So that's what I've been spending a good deal of time doing with my 'new' X-E1. Creating custom film simulation recipes and inputting them into the camera. I thought I'd share all seven of them over the next few months, as I get out and create images using the different profiles. And so I may as well start at the beginning - with 'C1' - a simulation that I have called "Classic Chrome".
If you are a Fuji X-T3, X-E3 or other later model camera owner, using the newest x-trans III sensor and processing engine, then you'll be lucky enough to have a 'Classic Chrome' film simulation built in to the camera itself. For many Fuji shooters, the Classic Chrome film simulation, as supplied by Fuji, is their go-to colour film simulation.
Unfortunately, if you have an older x-trans sensor, with an older processing unit, then your camera won't support Fuji's classic chrome simulation as standard. You'll have to 'create' your own as best you can. That's what I've tried to do with my 'C1' setting on the X-E1 - create a 'Classic Chrome' look for the older, first generation x-trans sensor.
To be fair (and totally up-front), I haven't just plucked these settings out of thin air. There are plenty of sites on the interweb that have these 'recipes' available. All I've done is taken a few of them, applied them as a starting point, and 'tweaked' them where I've seen fit.
So what settings do I apply to get a 'Classic Chrome' film simulation on the X-E1? These are the settings that I use:
 ISO 200 (will change when appropriate)
Dynamic Range: Auto
White Balance: Auto
Noise Reduction: -2
Image Size: Large 3:2
Image Quality: Raw + Jpg fine
Film simulation base: Astia Soft
Highlight Tone: +1
Shadow Tone: -2
Colour: +1
Sharpness: -1
This will be my 'go to' colour setting, which is why I have it programmed into my first slot. As you can see from the unedited jpeg of the first image above, it gives a reasonably punchy, yet true-to-life rendering of the scene, based off of Fuji's own Astia film simulation. All the settings are fairly self-explanatory; highlights are boosted and shadows reduced for that classic 'S' curve look - colour is increased a touch, and sharpness reduced a touch. Even with the sharpness set to -1 (-2 is the maximum), the resulting images are plenty sharp enough. I'm finding that I'm having to do very little - if any - sharpening in post with the Fuji files from the X-E1 - jpeg or RAW.
All of the images in this post are jpegs, shot with the Classic Chrome simulation. Having said that, they are not all shown here 'straight out of camera'. I've still done some post-processing to the final images. This has, however, been minimal, and really only slight tweaking to get the image to fit my style. All have had a slight clarity and dehaze boost (around 15 to 20) and maybe a little highlight/shadow fix depending on the lighting conditions for each scene. Some have even had a slight 'de-saturation' applied because I thought that the blues were a bit too overdone (see image below). But again, this varied from scene to scene.
What I can say, from someone who has been a RAW-only shooter since using his first digital camera, is that the Jpeg files from the x-trans sensor still have a decent amount of latitude in them for post-processing. I appreciate that the look is 'baked' into the file, but even settings like the White Balance in the first two images of this post were able to be warmed up in the jpeg file for a more pleasing final result. As long as the jpeg is in the ball-park exposure-wise, detail and information can still be pulled out of the highlights and shadows in Lightroom. Of course I wouldn't want to recover a jpeg image that was horribly wrong. But given that you can 'see' your exposure and white balance in the evf before taking the image, you shouldn't be horribly off to begin with.
The Fuji X-E1 is really the first camera that I've ever defaulted to shooting RAW + Jpeg files in - simply because I want to make use of the film simulations. Olympus had a similar thing with their cameras and the different Art Filters, but I found that most of those were of very limited use. Their Grainy B&W art filter was my favourite, and I did shoot with this filter from time to time, but it was a little (actually a lot) overdone, and I would quickly default back to shooting RAW only.
With Fujifilm's ability to programme your own film simulation recipes - to dial in your own 'look' - I'm now actually excited to shoot jpegs. If I can get the look that I'm after 90% there in-camera, and then simply adjust the clarity and dehaze in Lightroom as required, my post-processing time will be halved overnight. And if I find, over time, that I'm adding a fairly standard amount of these settings to every image, then I may just set up an import preset and get there 99% of the time without having to do any post-processing at all! And if I do change my mind later on, then there's always the RAW file as a back-up.
Thinking of the jpeg as the 'original' and the RAW file as the 'back-up' is a huge mind-shift for me, and possibly a bridge-to-far for some RAW diehards? But looking at the images above - all jpegs - and comparing them to the RAW files for the same image, the jpeg is exactly how I would have processed the RAW file anyway - so why bother!?
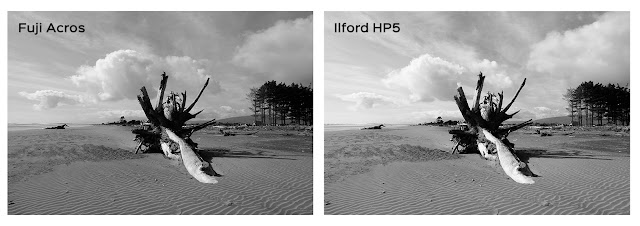
As mentioned at the beginning of this post, 'Classic Chrome' will be my go-to custom colour film simulation recipe - especially for landscapes, which is 90% of what I shoot. Next time, I'll have a look at my go-to black and white film recipe - my version of another Fuji classic, Acros.
As an old film shooter, who enjoys using film from time to time, the lure of using a digital camera that you can set to 'Velvia' is very enticing. Even though we all know that it's still only a digital file - right?! And what's even more enticing - to me at least - is having the ability to create your own film 'looks' (up to seven in the X-E1) and access them very quickly.
So that's what I've been spending a good deal of time doing with my 'new' X-E1. Creating custom film simulation recipes and inputting them into the camera. I thought I'd share all seven of them over the next few months, as I get out and create images using the different profiles. And so I may as well start at the beginning - with 'C1' - a simulation that I have called "Classic Chrome".
 |
| Lake Brunner Jetty, Moana. Fujifilm X-E1 with Fujinon 16-50mm. f/10 @ 1/60th, ISO 200. (16mm - 27mm equivalent) |
 |
| Unedited Jpeg from camera with C1 Classic Chrome film recipe applied |
Unfortunately, if you have an older x-trans sensor, with an older processing unit, then your camera won't support Fuji's classic chrome simulation as standard. You'll have to 'create' your own as best you can. That's what I've tried to do with my 'C1' setting on the X-E1 - create a 'Classic Chrome' look for the older, first generation x-trans sensor.
To be fair (and totally up-front), I haven't just plucked these settings out of thin air. There are plenty of sites on the interweb that have these 'recipes' available. All I've done is taken a few of them, applied them as a starting point, and 'tweaked' them where I've seen fit.
 |
| Lake Brunner Jetty under Mt. Te Kinga. Fuji X-E1 with Fujinon 16-50mm. f/11 @ 1/6th, ISO 200. (23mm - 35mm equivalent). C1 - Classic Chrome jpeg |

Dynamic Range: Auto
White Balance: Auto
Noise Reduction: -2
Image Size: Large 3:2
Image Quality: Raw + Jpg fine
Film simulation base: Astia Soft
Highlight Tone: +1
Shadow Tone: -2
Colour: +1
Sharpness: -1
This will be my 'go to' colour setting, which is why I have it programmed into my first slot. As you can see from the unedited jpeg of the first image above, it gives a reasonably punchy, yet true-to-life rendering of the scene, based off of Fuji's own Astia film simulation. All the settings are fairly self-explanatory; highlights are boosted and shadows reduced for that classic 'S' curve look - colour is increased a touch, and sharpness reduced a touch. Even with the sharpness set to -1 (-2 is the maximum), the resulting images are plenty sharp enough. I'm finding that I'm having to do very little - if any - sharpening in post with the Fuji files from the X-E1 - jpeg or RAW.
 |
| Tour Boat, Lake Brunner. Fuji X-E1 with Fujinon 16-50mm. f/11 @ 1/125th, ISO 200. (24mm - 36mm equivalent). C1 - Classic Chrome jpeg |
 |
| Waiting for Summer. Fuxi X-E1 with Fujinon 16-50mm. f/8 @ 1/280th, ISO 400. (17mm - 25mm equivalent). C1 - Classic Chrome jpeg |
 |
| Aotearoa - Land of the Long White Cloud. Fuji X-E1 with Fujinon 16-50mm. f/8 @ 1/125, ISO 200. (22mm - 33mm equivalent). C1 - Classic Chrome |
With Fujifilm's ability to programme your own film simulation recipes - to dial in your own 'look' - I'm now actually excited to shoot jpegs. If I can get the look that I'm after 90% there in-camera, and then simply adjust the clarity and dehaze in Lightroom as required, my post-processing time will be halved overnight. And if I find, over time, that I'm adding a fairly standard amount of these settings to every image, then I may just set up an import preset and get there 99% of the time without having to do any post-processing at all! And if I do change my mind later on, then there's always the RAW file as a back-up.
 |
| Lake Brunner, Moana. Fuji X-E1 with Fujinon 16-50mm. f/8 @ 1/240th, ISO 200. (36mm - 53mm equivalent). C1 - Classic Chrome |
As mentioned at the beginning of this post, 'Classic Chrome' will be my go-to custom colour film simulation recipe - especially for landscapes, which is 90% of what I shoot. Next time, I'll have a look at my go-to black and white film recipe - my version of another Fuji classic, Acros.

Thank you very much for this article. I own the XE-1 + 18 / 55 mm and the 55/200mm. I just ordered the 27 mm pancake.
ReplyDeleteI'll test your settings. Thank you again.
Gilles