Weekends are busy around the Lorimer household, with chores, gardens and lawns to keep up with. We've had an amazingly long, dry, hot summer here in New Zealand, and the warm weather continues - but I've been itching to get out with the Fuji X10 and have a 'play'. I finally got my chance late yesterday (Sunday) afternoon, so I headed to a local mining site to start to get to grips with my new camera.
Brunner was the site of a major mining disaster on the Coast last century, and is well worth the visit. Lots of old relics and cool industrial objects to photograph. What I really wanted to test at the start was the X10's sharpness as a landscape camera, because I'd taken a few quick photos earlier and had been slightly disappointed with the results. The whole middle section seemed slightly 'unsharp' to me, surprisingly given that is where the focus point should be at its sharpest? So first off, a few landscape shots....
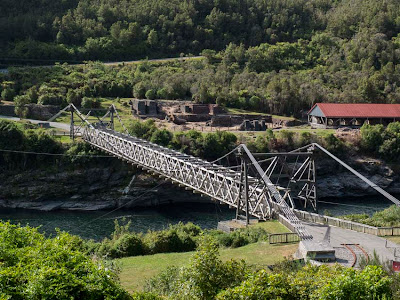 |
| The new bridge at the Brunner Mine Site |
I shot the above image at f8, in RAW (L) with DR at 100% - as high as the DR will go when shooting only in RAW. Obviously when shooting in RAW you need to apply your own sharpening later in Lightroom (yes, I am using Lightroom), because none is applied to the RAW file itself. My conclusion when looking over the resulting sharpened image? It probably is sharp enough - especially given the size of the sensor. I think I've been a bit spoilt with the APS-C sized sensors (and full frame in the 5D) that I'm used to shooting with and viewing later on screen. In relation to those, the X10 just seems a little 'mushy' - a bit less defined. But I've downloaded some other in-camera images from the X10 off the web, and they don't look any sharper than my own, so it seems that I may have some 'readjusting' to do with my own image expectations?
 |
| Old Coal Wagon, Brunner Mine |
As mentioned for the previous image, I began the afternoon shooting exclusively in RAW (L), giving me a DR (Dynamic Range) of 100%. The late afternoon sun meant dealing with either bright highlights, or deep shadows (or potentially both) and I wanted to see if I could get away with shooting RAW only at DR100% (the lowest DR setting). From what I understand reading the forums and technical specs on the X10, if you shoot only in RAW then you forgo the snazzy dynamic range algorithms of the EXR sensor, and basically have a point and shoot that is capturing the RAW image. If, however, you find that the DR limitations of the smaller sensor sees you wanting more leeway, then you need to switch to shooting in RAW + Jpeg, which allows for 400% DR, but drops the RAW capture in half (down to 6MB rather than 12!). I
never shoot in RAW + Jpeg (I've never really seen the point), but with the X10, I may have to re-think this strategy as well?
 |
| High contrast black and white preset developed in Lightroom |
The X10 isn't really a 'run and gun' style camera, it's more set up for those of us who prefer a methodical approach to picture taking. Since this is my style anyway, and since I am constantly riding the exposure compensation and checking the histogram, this rangefinder style of shooting suits me perfectly. What I do wish for, however, is an option to see the histogram information once the image is taken. I have the shot display for 1.5 seconds on the back of the camera - just to confirm composition and exposure. But it's a display that only shows the image - no histogram information (unlike my DLSR setup), and so I find myself constantly going into the playback menu just to check the histogram. Not a deal breaker, given my methodical shooting style, but it would still be nice to have an option to view the histogram info immediately (for those of us who insist on using the viewfinder and
not Live View for composition).
 |
| The Coke Ovens produced very difficult lighting |
The constant checking, readjusting exposure compensation, shooting, and checking again, produced histograms that I was very happy with - until I started shooting the Coke Ovens. Very strong side lighting and dark interiors gave DR100% a run for its money, so in the end I switched to RAW + Jpeg and set the DR to 400%. At DR100% I couldn't get any detail in the highlight areas of the stone bricks without underexposing the interior completely. A switch to DR400% in RAW + Jpeg and I easily achieved detail in both. This is enough to convince me, when working in extreme lighting situations, that RAW + Jpeg at DR400% is indeed the way to go. What you loose in file resolution you more than make up for in dynamic range.
 |
| Coal Chimney, Brunner Mine Site |
One final thought on using the optical viewfinder on the X10 as opposed to using the LCD in Live view. Yes, you do need to re-adjust slightly to get the composition the way you would like (a little down and to the right), and yes, the lack of any exposure confirmation leaves you relying on the audible 'beep' and visual green light. But for me, the trade-off with using the camera in a more 'traditional' shooting fashion is worth it. The trouble is, I was also listening to my iPod while shooting, and couldn't always hear the 'beep' to confirm focus lock. This did mean a few out of focus images as a result. But not too many. Think I might leave my iPod at home next time though :-)


Great blog thanks for sharing your experience
ReplyDelete