If you're playing along at home (and thanks if you are btw), then you will know that the first three film simulation modes I've recently programmed on my X-E2 have all been colour. The X-E2 has space for seven custom simulations (often referred to as film 'recipes'), and most Fuji shooters use them to replicate particular film stocks. In my C5 setting I have a punchy Velvia recipe that I wrote about
here. In pride-of-place in the C1 setting, and the colour profile I'll probably use the most, I have a Kodak E100SW simulation outlined
here. And in the C7 setting, a good all-rounder colour recipe that will also get a lot of use - Kodak Gold 200 shown
here. That's a lot of colour - and I've still got two to go. But what about Black and White?
 |
Rapahoe morning light. Fuji X-E2. f11@ 1/3rd sec, ISO 200. Polariser/Grad filter. Acros recipe
|
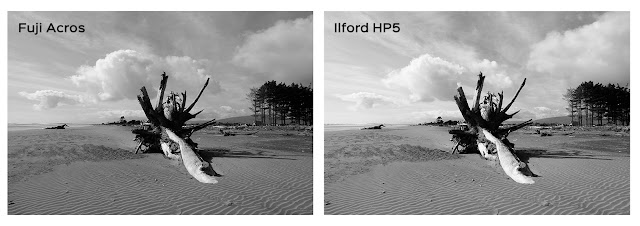
Of course I haven't forgotten monochrome. Two of the seven custom settings have monochrome film stocks programmed. If my C1 setting will get the most use in terms of the colour profile I will use, then my C2 setting will be my go-to black and white simulation. And there's only one film I want for that task - Fuji Acros. I love shooting with Acros film (for real), it's my favourite monochrome stock hands-down. So it's no surprise that I've tried to replicate the Acros look on my Fuji X-E2.
 |
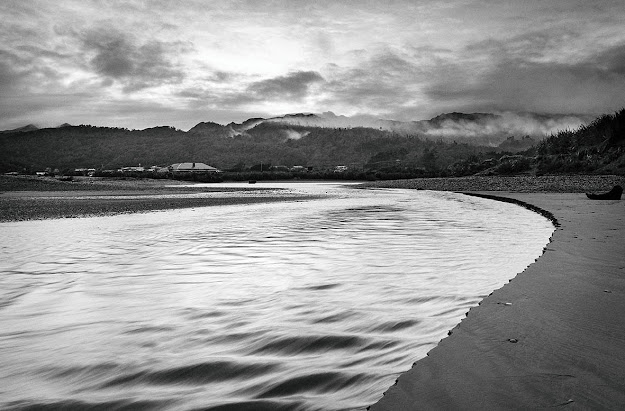
A river runs through it. Fuji X-E2. f11 @ 1/8th sec, ISO 200. Polariser/Grad. Acros recipe
|
Just like with my Velvia recipe, some of you might now be thinking - "hang on a minute. Don't the Fuji cameras already have an Acros film stock built in"? And you'd be right - kind of. Newer Fuji cameras with the X-Trans III sensor indeed do have the Acros film stock as an option. But alas, none of the X-Trans II or earlier cameras do. If I had an X-E3, then I could simply choose Acros in the film settings and get on with it. Why muck around with a profile engineered by Fuji themselves!? But unfortunately, I don't have that option. So I'm using an Acros film recipe instead.
 |
Islands in the Steam. Fuji X-E2. f/11 @ 1sec, ISO 200. Cokin Polariser/Grad filter. Acros recipe
|
I've outlined an Acros film recipe that I was using on my X-E1 before
here. And in truth, not much has changed from that original recipe. Although it has changed just a little. The white balance setting has been tweaked a little (simply to fall in-line with some of my colour profiles), and the ISO has been changed to 'Auto' up to ISO 6400. But to all intents and purposes, I'm using the same Acros recipe in my X-E2 than I did in my X-E1. And while I'm happy to leave the ISO on 'Auto' for every-day, casual shooting, for all the landscapes shot for this post, on a tripod, I set the ISO manually at 200 for the cleanest noise performance.
 |
Rapahoe Beach, low tide. Fuji X-E2 with Fujinon XC16-50mm. f/8 @ 1/100th, ISO 200. Acros
|
Not that I have an issue with 'noise' mind you. The X-E2 gives fairly clean files, even up to 6400. But rather than introduce noise, I've added grain in post-processing to replicate the film look. This can be done a number of different ways in Lightroom, or Photoshop. However I prefer to use a plug-in to add film grain - Nik Software's Analog Efex Pro 2.
The name says it all really - Analog Efex - and it allows you to produce any number of varying 'film' looks to your images. You can add bokeh, light leaks, film scratches, frames and borders, grain, toning - you name it, this plug-in can do it. I don't tend to use a lot of plug-ins - most of the effects are just gimmicky. I use Analog Efex for one purpose, and one purpose only - to add film grain. Nothing else. And even then, with Acros being such a fine-grained and smooth looking film, the effect is subtle. But it's there.
 |
Rapahoe Bridge. Fuji X-E2. HDR Exposure blend, Nik HDR Efex Pro2. Acros film recipe
|
The other Nik plug-in that I will use occasionally is HDR Efex Pro2. Of all the HDR type plug-ins I've used (and I've used a lot), I find Nik's HDR Efex Pro 2 to be one the simplest, yet most effective. As you can see above (hopefully), the results can be quite 'natural' without looking too over-processed and obviously HDR.
 |
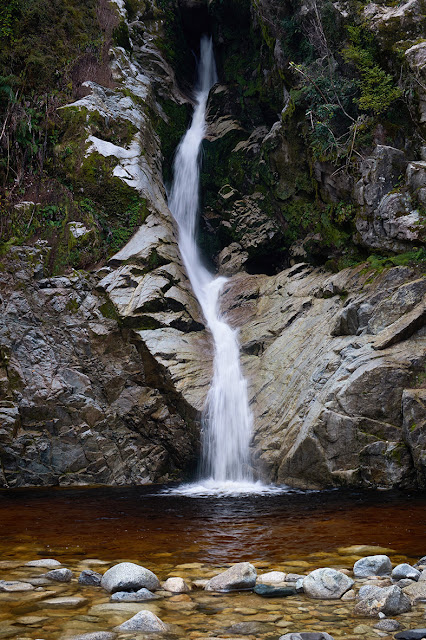
Swiftly moving. Fuji X-E2. f/11 @ 1/6th, ISO 100 (Low). Acros film recipe
|
So what are my Acros film simulation settings? As seen from the 'Q' menu, it uses the Monochrome + Y as a base for a little extra contrast, which is then increased by adding +1 for shadow tone. Highlights are left at 0, with a slight +1 sharpness increase and noise reduction effectively off at -2. Dynamic range is the standard 100, and as mentioned earlier, ISO is set to auto, up to 6400. I will, however, manually set the ISO to its lowest setting when working on a tripod. Finally, WB is set to 'auto', although the red and blue channels have been 'tweaked' slightly (+1R, -1B) in keeping with the colour profiles also set in the camera. This should also give a subtle contrast boost - something I prefer with my monochrome images anyway. And there you have it... Acros film simulation for the X-Trans II sensor.
 |
Rapahoe Beach. Fuji X-E2 with Fujinon XC16-50mm. f/6 @ 1/60th, ISO 500. Acros recipe
|
I say this with all my film simulation recipes, so I'll say it again... Is it exactly like shooting with Acros film? No, of course not. Does it end up looking exactly how Acros film would under the same conditions? No, probably not. But do I care? No, I do not. Because what the Acros film simulation is (and indeed what all the film simulations are) is a feeling. A 'simulation' to use the exact term, of something akin to using Acros - a fine grained, standard black and white film for my general b&w photography.
 So what are my Acros film simulation settings? As seen from the 'Q' menu, it uses the Monochrome + Y as a base for a little extra contrast, which is then increased by adding +1 for shadow tone. Highlights are left at 0, with a slight +1 sharpness increase and noise reduction effectively off at -2. Dynamic range is the standard 100, and as mentioned earlier, ISO is set to auto, up to 6400. I will, however, manually set the ISO to its lowest setting when working on a tripod. Finally, WB is set to 'auto', although the red and blue channels have been 'tweaked' slightly (+1R, -1B) in keeping with the colour profiles also set in the camera. This should also give a subtle contrast boost - something I prefer with my monochrome images anyway. And there you have it... Acros film simulation for the X-Trans II sensor.


Comments
Post a Comment