Should you post-process a Fujifilm Jpeg?
One of the major arguments for shooting Jpegs instead of RAW is that the 'look' you want is already baked into the file and you don't need to post-process the image. The whole SOOC (straight out of camera) movement has become very popular with the rise of Fuji film simulations and custom 'recipes'. I'm having a blast shooting with my custom film recipes on the Fuji X-E2 - but does this really mean that I'm only showing images SOOC? Is there no post-processing involved at all? And if there is, how much can you do on 'only' a Jpeg?
Well, to answer the first question - No, I'm not just showing images SOOC. I do still process my Jpegs to get the final image. Some admittedly more than others. I thought it might be worthwhile looking at a few recent examples, where I have done a reasonable amount of post-processing work on a Jpeg, and discuss why.
 |
| Original image. E100SW recipe SOOC |
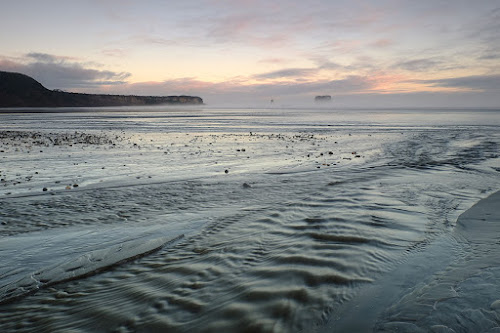
On a recent trip to Rapahoe Beach to try out my Acros film recipe (post here), I also shot a few colour images. I used my C1 Kodachrome E100SW recipe for the colour images, and although I liked them, I felt they could do with a bit more punch. Maybe I should have used the Velvia simulation instead?
Be that as it may, because I was very careful not to blow out the highlights, the results were a little on the dark and flat side in areas. So they were definitely images I wanted to 'post-process' to get the best out of them.
I don't mind post-processing Jpeg files to get them exactly how I want them to look. To be honest, even with using film recipes, I never expected every image to be perfect SOOC. I think of it as being 80 or 90% of the way there, and I'm just adding that extra 10%. In this first image, I wanted a little more colour and a lot more contrast to the scene. All of this was achieved in Adobe Lightroom (still my editing software of choice) - with a slight saturation boost, some clarity and dehaze adjustments, and a couple of radial gradient filters to control exposure in certain areas.
 |
| Rapahoe Beach, low tide. X-E2 with XC16-50mm. f/11 @ 1/6th sec, ISO 200. E100SW recipe |
I hope you'll agree that the resulting photo, while not wildly different, is better for having had some post-processing done on it. Other than what I've already mentioned above, I also added a slight vignette as well as some film grain (in Nik's Analog Efex Pro2) to just finish it off. To some, that all might sound like a lot of post-processing on a Jpeg that should be good to go straight out of the camera - and then maybe to others it won't sound like a lot of work at all? Your mileage may vary.
 |
| Original image. E100SW recipe SOOC |
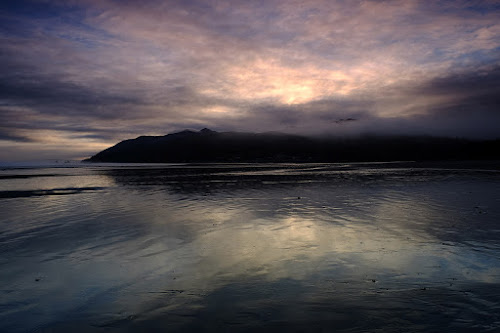
For this next example I knew I was going to have to do some post-processing on this image as soon as I took it. Once again, preserving the highlights has meant quite a lot of under-exposure (this is going to be a reoccurring theme) - so much so that I wasn't sure the shadows were going to be recoverable from a Jpeg?
The sun was just starting to rise up over the hills, and somewhere down at the base of the mountain was a group of houses that I could see with my eyes, and wanted to show up in the final image. As you can see, the resulting Jpeg doesn't show them at all. They are completely lost in the underexposed land mass. Yet I had no choice but to underexpose it, so I could retain the detail in that rising sun at all cost!
 |
| Rapahoe Township at Dawn. X-E2 with XC16-50mm. f/8 @ 1/20th, ISO 100. E100SW recipe |
I was amazed, and delighted, with the amount of detail I was able to bring back during processing of this image. I couldn't believe I could recover the mist and colour in the hills at all, let alone the houses that were completely lost in the original file. Yes, there is a little 'noise' as a result of bringing that much detail back out in the shadows - there always is, even in RAW files. It's really not bad at all, and when I add the film grain in to the image anyway, it all just looks natural.
My post-processing workflow is fairly consistent with all my images - a little highlight/shadow recovery, a little clarity and dehaze adjustment, a little saturation boost - and some dodging and burning mostly using the radial gradient tool - all in Lightroom. And bingo, a final image.
The post-processing used on this image would be about the most I would ever have to do - 10 minutes tops. Any more than that and it's an image not worth working on. And most of the images I post here take considerably less time. A slight exposure tweak, a bit of clarity (maybe) and they are all done!
 |
| Original image. E100SW recipe SOOC |
The final example is more of the same. A little under-exposed, a little flat, and in need of a slight 'lift'. I won't bore you with repeating myself yet again - the processing on this image follows the example of the first two - and ends up with the same result.... a much better final image than the one SOOC.
 |
| Rapahoe Beach Sunrise. X-E2 with XC16-50mm. f/11 @ 1/2sec, ISO 100. E100SW recipe |
So is this whole SOOC thing a bit of a con? It may very well be - for me at least. Looking through my files in Lightroom, even the ones that are 99% there still could do with a slight exposure tweak and/or straightening/cropping. I'm not a Photoshop fanboy that spends hours on one image and believes that every pixel should be punished within an inch of its life. But neither am I naive enough to think that no image should ever go through some sort of post-processing workflow.
And that, for me, is where the Jpeg film simulation recipes make a lot of sense. Because while I may end up doing some processing of my final 'selects', the time it takes to get there is vastly reduced if I'm not shooting RAW images. Because the 'look' I'm after is mostly there - I'm just massaging it a bit. And most of the time, it's just a little bit. And yes, Jpegs can handle post-processing. In some cases, quite a lot of post-processing. As long as you guard those highlights with your life!


Comments
Post a Comment