My Kodak Gold 200 film recipe for the Fujifilm X-E2
There's an old saying that goes "Make hay while the sun shines". Here on the South Island's West Coast (sometimes jokingly referred to as the 'Wet' Coast), you have to take that saying to heart and make photographs while the sun shines! The long-range forecast for the coming week (as I write this) is not looking great. Rain, with the chance of rain, interrupted by the occasional downpour of rain. So yeah, not good.
Which of course, as already mentioned, makes it tricky when you live in a part of the world that rains a lot. We aren't surrounded by native rain forest for nothing!
Yes, I know, rain makes for great moody landscape photos. But I'm sorry, it's just not me. I can't really understand looking outside at the pouring rain and thinking "great - time to go and take photos"!? For a start, my gear isn't weather-sealed, so that's not good. But even when I did have weather-sealed camera gear, the last thing I really wanted to be doing with it was slogging around in the wet, constantly struggling to keep the front lens element clear of rain (not to mention my own glasses), just so I could catch pneumonia and a 'moody' landscape. Call me a fair-weather photographer if you like (go ahead, I don't mind), but photography in the wet just isn't for me.
 |
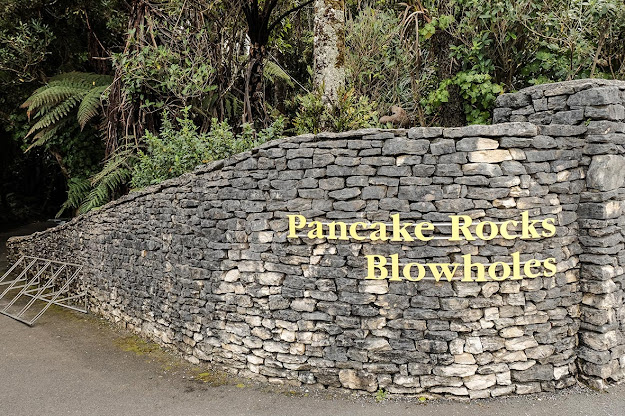
| Pancake Rocks entrance. f/8 @ 1/60th. ISO 400. Kodak Gold 200 film simulation recipe |
Getting back to my original introduction to this post - with bad weather approaching for the week ahead, my wife and I decided to head out to the famous Punakaiki Pancake Rocks. I'm still working through my seven custom film simulations on the Fuji X-E2 (see the Velvia post here and the E100SW post here) and thought that a trip to the Pancake Rocks would be the ideal opportunity to try out another recipe.
 |
| Punakaiki Coastline. X-E2 with XC16-50mm. f/8 @ 1/320th, ISO 400. Kodak Gold 200 recipe |
The first two simulations I've tested have both been slide film stocks - even though by my own admission I don't shoot a lot of slide film normally. For my third test I wanted to try something that I have a bit more experience with - Kodak Gold 200. A staple, amateur film stock that almost everybody has shot with at one time or another.
It is actually a favorite film of mine. Yes, I know it's not a 'professional' film, so colours between batches might be ever so slightly different - maybe? But it's a good, everyday, all-conditions type of film that's great for recording life and those 'kodak moments'. On their technical spec sheet for the film, Kodak state that Gold 200 "offers an outstanding combination of color saturation, fine grain, and high sharpness... designed for general picture-taking situations in daylight or with electronic flash". I concur. And that's exactly what I'm after with my Kodak Gold 200 film simulation recipe.
 |
| Lifebuoy. Fuji X-E2 with XC16-50mm. f/5.6 @ 1/320th, ISO 400. Kodak Gold 200 simulation |
The day was somewhat overcast, with a lot of low-hanging cloud. This still left a lot of light, but also meant that the dynamic range between the very white/grey sky and the darker rocks was quite extreme. I often found I was looking at a histogram in the viewfinder that was bunching up on the extreme left and right sides (shadows and highlights), with less information in the mid-tones.
With all of my Jpegs I'm taking care not to blow out the highlights. So more often than not I am slightly under-exposing. This is something of a mind-shift for me, as I'm used to shooting RAW and 'exposing to the right' (highlights) as much as possible. I know that if I expose for the highlights shooting RAW, I'm capturing all the information the sensor has to offer, and I can 'recover' highlight and shadow detail in post production. But with Jpegs that are 'baked-in' files, I'm trying to under-expose a little to preserve highlights, and then either lift the shadows a little in editing, or let them go black.
As you can see from the images in this post, the slight under-exposure is having the desired effect - highlights are retained and shadows, while dark, aren't overly blocked-up. There's still some information retained to pull out in Lightroom. And while the above image might look a little dull - that's because it was a dull, overcast day.
Every camera measures exposure slightly differently, and you need to use your camera a lot to get a feel for how it handles different lighting scenarios. The histogram is a great tool, but it's only a guide. Get to know how much you can push the shadows and highlights of your sensor, so you will know what you can get away with out in the field. I'm finding that while I'm certainly taking note of the histogram, with Jpeg-only shooting I'm relying more on what the evf is telling me. If I can see detail in the highlights through the viewfinder of my Fuji X-E2, then I know my exposure is going to be ok.
So what does my Kodak Gold 200 recipe for the X-Trans II sensor consist of? It uses the Classic Chrome film stock as its base, and then switches things up by using the daylight white balance setting with a strong red channel lift and blue channel decrease. The recipe is as follows:
Kodak Gold 200
Film base: Classic Chrome
Dynamic range: Auto
Colour: +2
Sharpness: 0
Highlight Tone: -2
Shadow Tone: +1
Noise reduction: -2
White balance: Daylight with a +4R and -5B colour shift
ISO: Auto up to 3200
 |
| Coastline at Punakaiki. Fuji X-E2. f/8 @ 1/180th, ISO 400. Kodak Gold 200 sim |
My Kodak Gold 200 recipe is a tweaked version of the X-Trans III one over on Richie Roesch's Fuji X Weekly blog. I know I mention his blog with every recipe I post - with good reason. Since this is where I get my starting point for my own X-Trans II versions. The settings are very similar - in so much as they can be when creating a recipe for my X-E2 from an X-Trans III formula.
Upon reviewing the images I took at Punakaiki with this recipe, there was one significant change I made to the original. Richie's Kodak Gold recipe uses -2 sharpening, which I think softens the final Jpeg too much. Kodak call Gold 200 a high sharpness film, so I found -2 sharpening to be way too soft. I've used 0 sharpening for my recipe, and I'll see how that goes. I may in fact take that up to +1, but will see what I think at 0 for a while.
 |
| Heading back to the Cafe. Fuji X-E2. f/8 @ 1/120th, ISO 400. Kodak Gold film recipe |
In all other respects, I'm very happy with my 'Kodak Gold 200' recipe. I know I've said this for every film simulation recipe so far, but it's worth repeating again... Is it exactly like shooting with Kodak Gold 200 film? No, of course it isn't. It's digital - not film. I haven't added any grain to the images, which is a dead giveaway - although I'd very much like to. Adding grain to the Jpeg 'in-camera' is one of the features I would dearly love to have, and is a major reason I want to 'upgrade' to the Fuji X-E3. That, and the Acros film simulation - but that's a conversation for another post. But even so, adding grain to the jpeg still won't make it film.
What all of these film simulations represent to me is a style - a look - a feeling if you like, of the kind of image I'm trying to create shooting Jpegs SOOC (straight out of the camera). I could call it Classic Chrome with a +2 colour, 0 sharpness, -2 Highlight blah blah blah.... or I could call it Kodak Gold 200. Makes sense to me....
 |
| White Heron, Cobden Lagoon. X-E2 with XC50-230mm. f/8 @ 1/680th, ISO 200. Kodak Gold sim |
This last image was taken the day prior to going to Punakaiki - also using the Gold 200 film recipe. It was a much brighter day, and using the daylight white balance setting of the Kodak Gold simulation has produced more vibrant colours than on the overcast day at Punakaiki. I'm very pleased with the photos from both days, taken under very different conditions. If I'm looking for a recipe to mimic Kodak Gold 200 that "is designed for general picture-taking situations in daylight" then I definitely think I've found it.
I've placed this film simulation in the C7 slot, the last place in the custom menu. While this sounds like it has been tagged on to the end, almost as an afterthought, in reality it may end up being one of the simulations I use most often. The C7 slot is actually one of the quickest to access from the Q menu on Fuji cameras. The first is obviously 'C1', and if you click the scroll wheel to the right you get to C2, then C3 then C4 etc... But, if you're at C1 and you click the scroll wheel to the left, then you're instantly at C7. So in reality, C1, C2, and C7, are probably going to be my most used, and quickest to access custom slots.
The C1 slot uses the Kodak E100SW film recipe - my go-to for punchy, vibrant, colourful landscape images. The C7 slot has the Kodak Gold 200 for more natural, every-day picture taking 'kodak moments'. What's in the other 'prime' C2 slot? I'll discuss that in my next post...


Comments
Post a Comment